Home-my-Home |

- Контрольный списоок весны Moving
- DIY как терапия пар
- Самомоднейшие дома `самомоднейшего Family
- Украсьте вашу палубу для напольный развлекать
- HVAC надувает ваши счеты энергии? 7 знаков для этого нужна помощь
- Цветы краски рудоразборки: Она лична, не теория
- IPhone драматически преобразовывает кухню!
- К Campos-Gentile Люси конструкции на урбанском режиме: Беседы конструкции
- Деревянный контрольный списоок обслуживания палубы
- Малые подсказки космоса: Конструкция комнаты общей спальни коллежа
- Идеи конструкции комнаты прачечного
- 5 путей предотвратить домашние ремонты этот сезон дождей
- Совершенный Белый Дом для любовника искусства!
- Планировать напольную кухню
- Sunshiny изображения и воодушевленность окна
- Как к переходу между материалами настила
- Домашн Dehumidifying эффективный способ энергии
| Контрольный списоок весны Moving Posted: 15 Apr 2011 08:23 AM PDT Сезон весны приносит на переход для много людей. Больше семей двигают весной чем любой другой сезон и в мае, много студентов колледжа двигают от их резиденций времени школы к заднему дому. Паковать вверх по всему вы можете быть daunting и трудный задачей. Путем создавать план действий и подготовлять с правыми материалами, вы можете сделать процесс движения вне более менее напряжённый поэтому вы можете сфокусировать на ваших семье или выпускных экзаменах. 1. Сделайте список Brainstorm список всех категорий вещей вам будет нужно упаковать и написать их вниз. Путем делать это прежде чем вы даже начнете упаковать, вы сумеете как классифицировать ваши пожитки по мере того как вы приходите через их. Если вы приходите через больше групп в процессе упаковки, то добавьте их к вашему списку. Ваши категории могут быть комнатами, типами предметов, breakables, бумажными продуктами, etc. 2. чистыми оно вверх Чистка могла показаться как она должна прийти после двигать (и его делает!) но она также должна случиться раньше. Аккуратные поднимающие вверх ваши вещи и вакуумируют ваш пол перед начинать паковать. Делать ваш космос чистым поможет вам более лучше увидеть чего вы иметь, знаете где найти вещи, и ясно любые отговорки от начинать moving процесс. Этот шаг сохранит вас много фрустрация и сдержит вас мотивированный для того чтобы положить в коробку вверх по вашим вещам. |
| Posted: 15 Apr 2011 07:17 AM PDT Любое вне там наблюдая «родительство?» Оно один из наших фаворитов теперь, но мы специально любим то один из характеров, Crosby (сыгранное Dax Shepard) в настоящее время восстанавливаем заново закупленное домой как путь выиграть назад его ex-невесту, жасмин (сыгранный Утехой Bryant). Его члены семьи скептичны о если его планы преуспеют (за исключением Джоэл, показанного выше, шурин Crosby который также опытный строитель), то но вы знаете нас -- мы любим что-нибыдь с sub-plot DIY. И больше вы думаете о ем, DIY могут быть большим путем соединить пару. Подходящая аналогия для работы через твердые частицы и местных помех вашего прошлого для того чтобы построить что-то новое и глянцеватое которое представитель вашего будущего совместно. И если вы получаете сердитыми во время процесса? Он ничего некоторая демонстрация или каторжный труд не может вылечить--в конце дня, вы будете поэтому вымотано вам даже не вспомнит чего та придурковатая драка была о! |
| Самомоднейшие дома `самомоднейшего Family Posted: 15 Apr 2011 05:51 AM PDT It’s the hottest TV show this side of Seinfeld. It’s ABC’s Modern Family and when Phil, Claire and the rest of the clan get together it’s belly laughs all the way.Yet for us interior design freaks, another reason to love this show is the chance to get a glimpse of the fantastic homes these characters live in. From the vibrant yet tasteful home of Jay Pritchett and his wife Gloria Delgado to Phil and Claire Dunphy’s traditional yet cozy abode, there are so many interior design ideas to ogle over. Before we take a look at these spaces however, here’s a quick rundown of the lovable characters that make this show so much fun to watch:
Now that you’re familiar with the cast, here’s a look at the modern homes of this very modern family: The Dunphy Home According to Richard Berg, production designer for Modern Family, Phil and Claire’s home is ” Pottery Barn-Restoration Hardware traditional modern”. Here’s a look at this comfy, classic home: The exterior of the Dunphy house
The Dunphy living room and entranceway. We love the colors and the great beachy feel!  Dunphy livingroom and entranceway This is a shot of the family room. We love the fireplace and the great mix of colors!  Dunphy family room This is the Dunphy kitchen where a lot of the fun happens. We love how it looks like a real kitchen rather than a fake set.  Dunphy family kitchen Phil and Claire’s bedroom. While it’s not quite as colorful as the other rooms, it does look quite cozy. (We do love the wardrobe piece in the center of the room, however.)  Phil and Claire's bedroom Cam and Mitchell’s Home Described as a mix of tradional, contemporary and Asian design, Eric Stonestreet, who portrays Cam, says that “we like to joke that they went to Asia to get a baby that would match their decor.” The exterior of Cam and Mitchell’s house. We love its Mediterranean style!
Cam and Mitchell’s living room. We love how this room looks trendy yet still comfy.  Cam and Mitchell's living room Cam and Mitchell’s Kitchen. Besides LOVING Mitchell in his knickers we also LOVE the cheery yellow color scheme.  Cam and Mitchell's kitchen Cam and Mitchell’s dining room. We laugh just thinking of all the hysterical conversations that go on around that table!  Cam and Mitchell's dining room Lily’s Nursery. Our favorite room in the house! (Especially the mural of Cam and Mitchell hanging right over Lily’s crib so they could always watch over her.) Just divine!  Lilly's nursery Here’s an even better look at the mural!
Jay and Gloria’s House To find the perfect house for Jay and his new wife Gloria, series co-creator Steve Levitan didn’t have to go very far–the house he chose was right in his own neighborhood!
The entryway. You can definitely see Gloria’s spicy influence in the bold colors.  Entryway in Jay and Gloria's house We love the episode where Gloria got so fed up with Jay’s dog butler that she dragged it upstairs.
Jay and Gloria’s living room. We love the touches of animal print–it’s so Gloria Delgado!  Jay and Gloria's living room Jay and Gloria’s dining room. Here we see touches of both Jay and Gloria in the decor with the bright red table runner and animal print chairs combined with the muted brown walls and contemporary furniture.
Jay and Gloria’s kitchen. Here we love how the traditional is mixed with the fiery red walls.  Jay and Gloria's kitchen Jay and Gloria’s bedroom. We love the soothing colors here. (We’re also hysterical how in this scene Jay is making fun of all the pillows Gloria has on the bed.)
The dresser where Gloria keeps her underwear.
Jay and Gloria’s Olympic size pool. (We want one!!)  Jay and Gloria's backyard pool Now we want to hear from you: do you watch Modern Family? |
| Украсьте вашу палубу для напольный развлекать Posted: 14 Apr 2011 12:00 PM PDT Preparing for spring is a fun and exciting time. Spring represents a regeneration of life with beautiful flowers, color, buzzing bees and clean air. There is nothing better than to have a decorative and functional space to enjoy this lovely time of year. For many of us, that means the deck.
|
| HVAC надувает ваши счеты энергии? 7 знаков для этого нужна помощь Posted: 14 Apr 2011 11:05 AM PDT
HVAC is such a gift. If you've ever doubted what an amazing invention it is, just visit relatives that don't have central air in the middle of summer. You'll vow to never neglect yours again. To keep your home nice and comfortable as it should be, here’s how to lower your energy bill with a better-working HVAC, as well as seven red flags that indicate a problem with your little piece of paradise. Tune it UpStudies have found that AC units lose about 5% of their efficiency every year. This can mean a huge bump in your utility bills. Spending a little money on a tune-up can help you maintain 95% of the unit’s efficiency, helping you save money on the bill and making your unit last longer. An HVAC tune-up should consist of cleaning the coils, checking the compressor, oiling belts and checking pressure levels. On your end, good filters are important. Change them regularly to keep your system running smoothly. Cut Your Energy BillYou can lower your electric bill by blocking sunlight. Keep curtains closed until the sun has passed by the window. Close off vents to unused rooms, and keep those doors shut. Cool air descends, so the vents in the lowest level of the house should be closed. Teach your kids to close the door behind them every time they go in or out of the house. Finally, invest in an automatic thermostat so you can cut your A/C costs this summer, and your bill. 7 Signs Your HVAC Needs Help
1. Ice forming on the unit or lines If you look at the lines coming from your unit into the house and see condensation or ice, call a technician. It's not normal, and it's not good. 2. Unit is running but not cooling The A/C is on, you hear the fan going, but the air coming out of the vent is lukewarm. The problem could be anything from a serious freon leak to a minor fuse. Either way, it's a good time to call the specialist in. 3. HVAC unit is running for hours on end Listen to your unit, pay attention to when it's running and when it's not. If you realize yours has been running for three hours and the temperature in the house has only dropped one degree, it's time for a service call and possibly a new unit. 4. Mysterious noises Take time to listen to your unit. It should sound smooth with a nice, steady hum. If yours is clanking, rattling, and rolling then you might want to call for an inspection. There should not be any grating noises or rubbing sounds. 5. Scary electric bills Most people open their electric bills and have a good idea of what it will be. If yours is suddenly much larger than expected, your HVAC unit might be the culprit. Check pricing for a new heating system here. 6. Water leaks You should never see water puddling around your exterior unit. If you check your unit and find a collection of water near it, call a service technician for an inspection. 7. System is more than 10 years old The average life span of an air conditioner is only 10 to 12 years. The industry is constantly making advancements in unit efficiency. If yours was installed more than a decade ago, the chances are good that it's nearing the end of its life. Installing a new one will save you money on the electric bill every month. If a new unit just isn't in the budget right now, an inspection and tune-up could help you get a few more years out of it. Regular MaintenanceYou probably don't give your air conditioner a second thought. But once it dies, that's all you can think about. Having regular maintenance done will help you keep it running in top condition. Just as your furnace should be inspected annually, your air conditioner should also be inspected. Have any good HVAC tips of your own? Let us know in the comments. Images via FriendlyElectric |
| Цветы краски рудоразборки: Она лична, не теория Posted: 14 Apr 2011 09:00 AM PDT  photo: Jennifer I. Committing to a new paint color can be nerve-wracking. A friend once taped 15 paint chips to the wall, and asked her visitors to choose their favourite — of 15 variations on beige. Her inability to break the Bonds of Beige isn't unusual. Embracing color is a lot to ask in a neutral world. "Beige is popular because it's not white," is my rather unscientific theory. And beige walls are to homes what silver is to cars — great for resale. White’s so stark and cold, and color's a big commitment. It's so… bold. Three years ago, I chose to paint two accent walls fire-red, and friends said I'd become "angry" in the space. Honestly, I had apprehensions. I'd read the literature on colour, too. Yet within a year of painting those walls, I loved the look so much that I painted another four in the same fiery red. Two years later, I still don't have to take anger management classes, and my then-doubtful friends love the space. Psychology of colorFor more than a millennium, some theorists have believed colours have different psychological, physical, and even spiritual properties. Red, they say, is a color of anger, blood, vengeance — but others will say it's a creative color, symbolising passion and exuberance. Whoa. Two contradictory theories. Which is right? Good question. What's your gut say? Take the colour green. Ask practitioners of the ancient art of chromatherapy, they'll tell you green stimulates the Fourth Chakra, the heart, and helps one's sense of love and responsibility. Ask authors of fashion mag "decor advice columns" and they'll tell you not to paint a bedroom green because it'll make your skin look sickly, and heaven forbid you don't have a vibrant complexion dans le boudoir. A modern "color therapist," however, will suggest green soothes turbulent emotions, is relaxing, and inspires empathy, so it's perfect for a bedroom. Despite all that, my bedroom is a deep grass green from floor to ceiling, and I love my emerald cave. Maybe color therapists are right. Or maybe green's just right for me.  photo: peapodsquadmom Choosing paint colors: take a chanceMy "color theory" approach was simple. "I love green, I bet it'll look nice. That's an beautiful shade… Hmm, I'll do the ceiling too." Three years later, I still love my “grassy” space. Every time I paint, I try something completely different. Change is good for us, and can be surprising when it's all around you. Go ahead, take a chance. If you can't change your world, you can change your wall color. Personalize your space with colorA colour isn't something to choose because an expert who's never been in your house says it's a great choice. Color's not something a "theory" can solve for you. It's not something you pick because Nate Berkus used it in some Rhode Island "Urban Barn" model home. You can’t say "Oh, any shade will do." Color is personal. It's about you. More importantly, it's about your space. Your home has lighting conditions no other home has. No store, no show, no magazine can replicate how light enters and floats around your home. Light affects color. Other tones in your space — on shelves, art, linens, furniture, and even built-in accents — all change how other colors play in your home. What are the odds you'll "pick badly"? Well, let's say it happens. Big deal. Order some pizza, invite friends, have beverages, re-paint, and laugh. Sounds like fun.
Overcome the ‘color commitment jitters’Doing test patches can eliminate that. A few dollars, an hour of effort, and a couple painted 3×3' squares lived with for a week or two, and you'll know what works. It's a good move when you have the Color Commitment Jitters. Take it slow, see how a week of daylight unfolds with your choices. So, how do you pick the right color, then? Don't worry about design shows, magazines, or other people's opinions. Instead, turn to '80s music, and do like Roxette says: "Listen to your heart." How to find your colorLook around your home. What colors do you have a lot of? When do they look the best? What looks good next to them? React emotionally to colors, and make note of what inspires which emotion. When you're looking at chips, don't be afraid of the Dark Side. Remember, it will be different on a wall with furniture and art breaking it up, natural light spilling in. The color will be warmer, too, at home, as stores have cold lighting. Take all the similar shades of the chips you like — one's bound to work at home. Color is a deeply personal choice, but it doesn't hurt to bring along a visual friend who might be able to help you understand how to make colors work for you — or how a more muted color might be better suited in that space. Picking paint colors is fun!As a kid, picking paint was an exciting thing to do with Mom, and still is fun to do alone today. There's nothing like a complete color makeover of my home. My vivid eclectic space helps my creative life and keeps me hopping. That's my relationship with color, but what's yours? Some people in demanding careers need a more restorative and zen place after a long day. It really is about you, so embrace your tastes, explore them. Like most things in life, committing to a color is about following your instinct. Sometimes you choose badly, but when you get it right, the reward is wonderful. Next time you color your world, take a chance, choose paint that inspires you. Picking Paint Colors: It's Personal, Not Theory is a post from: BuildDirect. We cover a variety of home improvement products including laminate flooring, hardwood floors, bamboo flooring, tile, decking and more. We also offer a wide range of info on interior design, housing trends, home how to, green building and living, and more. Related posts: |
| IPhone драматически преобразовывает кухню! Posted: 14 Apr 2011 05:29 AM PDT Изумительн истинно! Thaler Тим конструктора изобретал совершенное разрешение к дискуссии – острова кухни; полезно или досады? На касании кнопки этот изумительный вымысел будет спрятанным хранением или той экстренной поверхностью в вашей кухне. Retractable остров кухни холодн достаточно но контролировать его от вашего iPhone внушителен! Вы действительно никогда не угадывали бы чего плитки пола покрывают. Остров кухни вниз! Это сликовое моторизованное движение проконтролировано гидровлическим подъемом в подвал который может снести 1500 фунтов. На нажиме кнопки от его iPhone Тим может принести вверх или положить прочь его остров кухни в минуты! Плитки пола начинают двигать для того чтобы сделать путь для грандиозного входа! Мы думали что INSTEON было холодно позволяющ нам управлять частями нашего дома как светлые переключатели, термостаты, приборы и замки но Тим предпринимало меры этому app более далее в будущее здесь. Старты рамки для того чтобы принять форму! Малая рамка была построена na górze гидровлического подъема который начинает как пол вытекая окончательно в остров путем вызывать переключатель INSTEON. Типичная в использовать малый космос! Бортовые двери все имеют специальные переключатели для того чтобы выключить переключатели INSTEON франтовские поэтому двери только двинут когда полно закрыно для аспекта безопасности! Сликовые гидротехник и идея гения! Этот изумительный вымысел может меньшее поддержание в исправном состоянии теперь и снова но it’ стоимость s оно. Мочь как раз создать больше космоса от iphone app типичные в технологии идиота. Сообщение через INSTEON в вашем доме как раз двигало вперед от быть самой надежной технологией smarthome к будущему беспроволочных домашних управления и конструкции. |
| К Campos-Gentile Люси конструкции на урбанском режиме: Беседы конструкции Posted: 13 Apr 2011 12:35 PM PDT  TO Design Basement Reno
Are you planning a kitchen or bathroom reno? Guest speaker Lucy Campos-Gentile, principle designer at TO Design and contributor to HomeRenovationGuide.com and HomeInteriorGuide.com‘s Makeover and Reno of the Month series is guesting at Urban Mode‘s “Design Talks” event. It’s happening tomorrow April 14, 7pm at 145 Tecumseh St., Toronto. See recent TO Design project galleries: Gorgeous Basement Reno, Classic Living Room, and Chic Bathroom. More info from the event website http://designtalks.ca:
|
| Деревянный контрольный списоок обслуживания палубы Posted: 13 Apr 2011 12:00 PM PDT  Camuru wood decking; very dense, durable, and long-lasting. Your involvement in maintaining wood decking like this makes it last even longer. Wood deck maintenance is an important aspect of ensuring that your deck will have many years of long-lasting beauty and functionality. Some of the things that are included in maintaining your deck include proper cleaning and sealing. These are absolutely vital procedures, and by completing these steps annually, you will have a beautiful deck for many years to come. By taking care of these steps you are helping to prevent the breakdown of the wood from elemental factors such as rain, hot sun and even wind. These elements can create warping, drying and cracking in the wood slats, making your deck look worn and tired. If your deck needs some polishing up, here are some steps to follow to help spruce it up: 1. Clean the surfaces thoroughly. Leaving debris on the deck will make the surfaces hard to treat later on. Things such as leaves, pine needles or trash can get in the way of your efforts. If the deck has started to turn gray in color, you may consider having your deck power-washed. This discoloration is a combination of dirt and oxidation in the wood. Power-washing cleans out the dirt and can give the wood a fresher appearance. If you’ve got a cedar deck, proceed with caution when it comes to power washing, since cedar is a softwood. You want to avoid gouging the deck surface with a power washer that has been set with too intense a jet stream. You may wish to find an alternate cleaning technique when it comes to cedar decking entirely to avoid the risk of damage. And remember; cedar naturally ages from amber tones into a silvery color which a lot of homeowner value rather than want to change. 2. Check the surfaces. If sanding is required, this would be a good step to complete. Many decks that have not been maintained tend to have a splintered look. This look is the sign of weathered and tired wood. If the splintering is severe, and the wood is appearing to look split, you may consider replacing that specific piece. Otherwise, just check to make sure that the surfaces are smooth. You should also considered checking for loose nails, or nails that are sticking up. If nails are sticking up, you can either hammer them back down, or replace them. This is a good way to avoid injury. 3. Choose a sealant. With this step, you will choose your sealant and begin to apply the product. Make sure you read all the labels so that you are aware of drying times, sun exposure or moisture exposure. This is important as you may live in an area that has extreme sun or rain. Choose the product that is best for your area so that you can properly protect the wood decking surface. You can choose a variety of colors including clear. If you had to replace any portion of the deck, a color choice might cover up the color difference nicely. Wood Deck Maintenance Materials ListThe materials that you should have for completing this project should be basic materials, and if you need to purchase them, they are usually inexpensive, common items. You can also find many free samples to try before starting your project, so you can always go to and look for items that could assist you. Before you begin your project, make sure you have all the supplies ready. You should have:
After you have gathered all of your supplies, and read all the labels, you should be ready to go. The best way to handle the project is to work from the top all the way down. This way you won’t have to worry about redoing a certain area. Take your time on your inspections, and your sealing process. This type of project can be done over the course of the weekend, depending on the size of the deck, but efficiency is the key. Make sure to apply a generous amount of sealant, allow it to dry completely, and depending the directions, you may need to apply again. The sealant is the key to protecting the wood, and ensuring that your deck remains beautiful and protected for many years to come. Plan on taking your time, and while working remember to not skip any areas that could be exposed to harsh weather. All exposed areas should be treated. So roll up those sleeves, and enjoy your project! Wood Deck Maintenance Checklist is a post from: BuildDirect. We cover a variety of home improvement products including laminate flooring, hardwood floors, bamboo flooring, tile, decking and more. We also offer a wide range of info on interior design, housing trends, home how to, green building and living, and more. Related posts: |
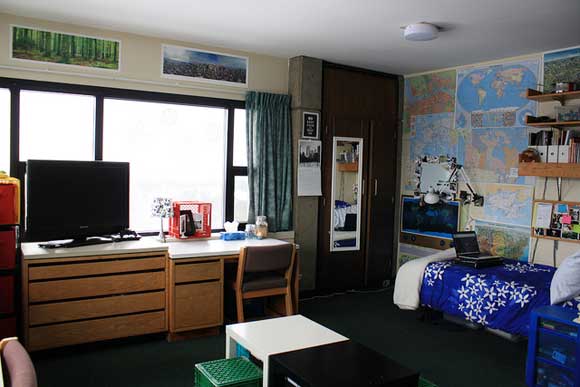
| Малые подсказки космоса: Конструкция комнаты общей спальни коллежа Posted: 13 Apr 2011 11:00 AM PDT
Our intern this year, Lauren, is a design student at Iowa State University and she's done a tremendous job working with us to improve and grow all facets of Charles & Hudson. Lauren lives in student housing (dorms) like thousands of other college students across the country. We asked her to provide some small space tips for living in a dorm room that should be required reading for any Freshman but you can also apply to your own small space living situation.
1. Purge it 2. Use Fabric Wisely 3. Prints, Not Posters
|
| Идеи конструкции комнаты прачечного Posted: 13 Apr 2011 09:00 AM PDT The Laundry Room: the unsung hero of the house. It’s a place that is mostly known for its functionality as a space for one of the most common, time-consuming, and important of chores. But, what if you could have all of that functionality (which is very important for a laundry area), and give it some stylistic pop as well? Laundry area and washing appliance expert Zach Smith advises on how to bring your laundry room to life. *** The laundry room area is perhaps the most neglected area of the house. For as long as it serves its purpose in cleaning our beloved clothes, little to no design is incorporated in it. Furthermore, all that cleaning and dispelling of water will only serve to detract the attractiveness of the place even if you do a bit of designing in your laundry room. But regardless, it actually lifts the spirits up if the clothes washing area is pleasing to the eyes. It also makes homeowners prouder to have an attractive-looking laundry space. So without further ado, here are some design ideas that you might want to inject in your laundry room: 1. Place your washing machine in a cabinetA laundry room cabinet is the perfect frame for your washer. But this might only work if you have a front loader. A nice cabinet also works in hiding the machine, or integrating it into your design idea overall. Make sure it is sturdy enough to carry the washer and the laundry loads, and check with your seller about whether your cabinet will manage the stress of a spin cycle. A nice platform should also works in giving it a good look. The platform can even help muffle out sounds in the washer to reduce unwanted vibration noise. You can also add a door to the cabinet. If your washer is not in use, you can close the cabinet to hide the washer, and increase the style quotient in your laundry area. 2. Add printed or colored floor rugs, or patterned tile floors The stylish laundry area: it's functional, but note how well the the tile floors complement the cabinetry, and the white walls and doors. No time to paint the laundry area? You can add color to the laundry room with the help of rugs. Choose rugs with prints that can draw attention from the bare walls, or give those walls, doors, cabinetry some interesting contrast. Also make sure you get an absorbent rug, since laundry areas are notable for high moisture content. This should also work well in absorbing leaks from the washer, should that ever occur. A great solution to the moisture issue is choosing patterned porcelain tile flooring, which although completely water-proof, provide a varied and stylish surface in laundry areas. 3. Use wicker basketsIf you don't have shelves or racks in your laundry area, wicker baskets can add character and practicality. You can also use wicker baskets as a storage units for your detergent and other laundry products. Stack cover-less wicker baskets or use the big and covered ones. You can also use the wicker baskets to make your clothes sorting easier. Purchase separate baskets for your colored and plain clothes. This way, you won't have to spend more time sorting your clothes out when it is time to do your laundry. 4. Enhance the window areaIdeally, a laundry area should have a window to allow air to circulate in and prevent odors and moisture from hanging in the air. But you can also make your window as a focal point in the room. Try adding drapes or breezy curtains. Choose prints or colors that will match or complement the color and the print of the rugs. And if you don’t have a window in your laundry area, why not think about getting an art print with a breezy, outdoor scene? 5. Set up an indoor clothes lineThis is kind of a practical tip, but can have design implications, too. To save energy, hang an indoor clothes line when your area may not permit traditional, outdoor lines. If the laundry area has good ventilation or even a large window, an indoor clothes line makes a good drying system. Purchase thick colored plastic strings. Make loops after every two inches or so of space. You can hang clothes hangers in the loop. Strategize on where you can place the clothes line in the room. Make sure that when you place the clothes lines, they are not parallel with one another. One line should be higher than the other to allow even drying. This is where the design aspect comes in. Think about choosing colors and materials for the lines. Choose colors for the pegs, loops, and for the hangers that complement the rest of the space. It’s a small thing, but can add up to just the right subtle detail to help bring your laundry area to life. Organization is keyYou can use these simple ideas in making your laundry area look better. Organization is the key. See to it that you have an ample space to fold your clothes. Also make sure that the washing machine is protected. Place it in an area where you can easily manage and maintain it. *** Thanks, Zach! Learn the benefits of using an LG Steam washer. For more information, check out washingmachineadvisor.com. Cheers, Rob. Laundry Room Design Ideas is a post from: BuildDirect. We cover a variety of home improvement products including laminate flooring, hardwood floors, bamboo flooring, tile, decking and more. We also offer a wide range of info on interior design, housing trends, home how to, green building and living, and more. Related posts: |
| 5 путей предотвратить домашние ремонты этот сезон дождей Posted: 13 Apr 2011 08:00 AM PDT
Spring is here, and I know you’re excited that your home has begun to defrost. But don’t let that distract you from checking on maintenance issues before April rain wreaks havoc on your property. Here’s a checklist to get you started. 1. Check for Water LeaksThis is a big one. Check your windows and doors, basement and attic for leaks. If you spot water damage, call a repair man right away. 2. Re-caulk and Weatherstrip Your Home
Before April showers turn to May flowers, there’s gonna be a whole lot of rain. Make sure your caulking is doing its job, and replace or update as needed. If your home was extra chilly this past winter, take a couple steps to weatherproof it as well. This will hold in air-conditioning much better in the summer months. 3. Take a Look at the HVAC
Has your HVAC system been struggling to heat the house? There are a few maintenance check-ups you can do yourself. Replacing air filters, for example, is cheap and should be done every three months to keep air circulation clean and healthy. Also, be sure to remove any debris, dirt or dust that may be clogging your furnace. We don’t recommend getting too technical with your HVAC, so if there’s a problem you aren’t sure about, call an HVAC pro instead. 4. Program Your Thermostat
If you haven’t already, buy a programmable thermostat. The savings on your energy bill, benefits to the environment and prevention of HVAC repairs down the road are immeasurable. Digital thermostats are inexpensive, and even just a two-degree difference on your A/C this summer can save you hundreds. 5. Inspect Gutters and Roofing
Nobody likes to clean the gutters, but at least they won’t be terribly clogged just yet. Check your gutters, remove a bit of debris from the winter snow, and inspect your roof while you’re up there. Are there any missing or damaged shingles? Call a roofer if something looks out problematic. This will prevent water damage in the rainy season. Have you planned for a little household TLC in the coming months? Let us know what’s on your to-do list in the comments. Photos via Getty Images |
| Совершенный Белый Дом для любовника искусства! Posted: 13 Apr 2011 03:30 AM PDT This classic contemporary house called the ‘White House Prahran’ in inner city Melbourne, Victoria, Australia was built for the director of an art gallery Anna Pappas, which not surprisingly includes a subterranean art gallery of it’s own! Prahran known colloquially as Pran is the suburb of the city where the house stands. She needed 2 bedrooms and also a study room which could convert to a guest room for her artists who come and visit. The architects Nervegna Reed and ph architects were challenged by the small plot, so instead of thinking floor space they thought height space enabling them to create this contemporary project of 364 sqm including the clients room requirements.
Rising high and capturing light from all angles! As usual the team lead by Toby Reed used their creative discipline and being specialists in urban design created an architectural delight that exceeded the gallery directors expectations.
A room with a view! The house is distributed over 3 floors with the gallery in the basement the living area’s on the middle floor, along with the entrance, and the top floor area that can be divided into twin occupancy or left open for sole. The living area’s contain a separate kitchen, living room, bathroom and dining room flowing around open iron stair wells, sliding timber doors and surrounded by a courtyard. The gallery in the basement is illuminated by a skylight that transforms into a seating podium and the end study has a separate bathroom for when artists stay over.
Minimalist dining with a view of architectural genius!
Cockpit style kitchen, yet totally functional!
Consideration of the interior changes through all the different angles!
Spa style bathing in the luxury of this clever designed space! As you enter the home the layout is technically confusing as there are so many directions you can choose, it has the feel of a well lit concrete rabbit warren. The way objects have been placed give the interior an abstract form where it represents shapes, colors and textures and not outside reality!
The placement of objects turn the interior to abstract form!
Perfectly placed to define shape, color and texture!
Which way next!
Enter in to the eccentric world of art and architecture!
Are this team pure genius or slightly mad? But they say madness borders on genius! |
| Posted: 12 Apr 2011 12:00 PM PDT
The best thing to have for those that enjoy their friends and family, and the great fresh air that spring brings, is by keeping all the events outside. This means cooking, drinks, seating and games if that is what you enjoy. Some people like to even watch television when there is a big game on. Having an outdoor kitchen can be the ticket to making this all happen very smoothly. An outdoor kitchen for maximum use and convenienceBelieve it or not, many people find that they use their outdoor kitchen more during spring through fall than they do their indoor kitchen. The reason for this is that the fresh air brings an excitement to cook and be part of nature. The advantages of outdoor kitchens is that all the food storage can be kept right by where the cooking will take place. Friends and family can feel comfortable in the outdoor extension of your home that you’ve created, including at meal times. Making the hassle of taking things from indoors to outdoors, and running back and forth a thing of the past. Many outdoor kitchens come in pieces, which means that assembly is a snap, and many run on propane, so fuel is self-contained. Also, the cost of cooling your interiors in summer months is greatly reduced, what with all of the cooking now done out of doors. Planning outdoor kitchensHere is a list of amenities that many kitchens feature:
These items are the difference between comfortable entertaining, and exceptional entertaining. You could prepare anything from BBQ to pasta dishes all in one space, without having to set foot indoors. Outdoor kitchens also come with options for wine racks, trash compactors and even dishwashers. It’s about having the necessities of a functioning kitchen at your fingertips in your yard. Popular surfaces in an outdoor kitchenOutdoor kitchens come with many options of materials that can be used for the perfect look you desire. For instance, they can come with the following types of finished products: Tiles Tiles can be used to complete the entire back area that would be visible to your guests. This can be done using ceramic tiles, like you would see on counter tops, or more decorative tiles like travertine tile or marble. This helps create a solid look that is low maintenance and easy to clean. Stack stone Stack stone is actually a veneer that is used to cover the surface. It gives the appearance of three-inch thick stones being stacked together to create the counters and cooking areas. This type of product requires very little maintenance and cleaning. These products are guaranteed to last as long as your kitchen and can handle weather exposure Stucco Stucco is a way to make the outdoor kitchen match your home if it is also in stucco. Many prefabricated outdoor kitchens come in stucco and can be ordered to match the interior of your home, to provide visual continuity. This can also be professionally applied for best results. Stone countertops The countertops for many of these are just as creative and they include products such as tile and granite, which can be chosen by you for that ultimate customization. There are many styles of granite countertops, and because the outdoor kitchen area is relatively small, the cost is not as much as many would think. These material options are all intended to be low maintenance and very durable to handle all the elements that weather can provide. Get Ready For SpringOutdoor kitchens are quickly installed, and can be done just in time for spring. There is no better way to improve the look of your yard than by having an inviting area that makes friends and family feel welcomed. Entertaining in the outdoors is a great way to celebrate the beautiful flowers, buzzing bees and fresh air that we all enjoy. Dress your new outdoor kitchen up with baskets of flowers, and prepare side treats of fruit and sun tea. If you are interested in your own outdoor kitchen, then visit BuildDirect for free samples and ideas on tile, countertops, and patio furnishings. Planning An Outdoor Kitchen is a post from: BuildDirect. We cover a variety of home improvement products including laminate flooring, hardwood floors, bamboo flooring, tile, decking and more. We also offer a wide range of info on interior design, housing trends, home how to, green building and living, and more. Related posts: |
| Sunshiny изображения и воодушевленность окна Posted: 12 Apr 2011 11:24 AM PDT В честь солнечности весны, более длинних часов дневного света и официального старта remodeling сезон, I’ d любит делить round-up красивейших изображений и воодушевленности замены окна. Проверите их вне, и если you’ d любит больше куда то пришло от, посещает нашу штольн окна. Изображения замены окна Окна замены в недавно remodeled кухне Живущие раздвижные двери комнаты и окна изображения Двойник повиснул идеи окна Заново установленные двойные повиснутые окна с белым уравновешиванием Сдобренное Windows Сдобренная верхняя часть, aka “ округленное top” окна Sunroom Windows Новые окна и двери для sunroom Для того чтобы выучить больше о получать окна замены, щелкните здесь. |
| Как к переходу между материалами настила Posted: 12 Apr 2011 10:41 AM PDT Препятствуйте нам сказать вас те использовать разные виды справляться в 2 комнатах, но вы имеете план довольно открытого пола и переход высоки видим. Должны вы scrap все проект или ручка до один тип настила? Щеколды, нет -- оно совсем о переходе. Мы были дунуты отсутствующим после смотреть талантливого разрешение Паыля Anater ухищренное к подобной проблеме. Во время проекта переконструкции, он столкнулся переход 45 градусов между 2 справляясь материалами: Бразильские вишня и плитка. Легкая вещь, котор нужно сделать, он пишет, был бы «побежать порог вишни 45 градусов между 2 комнатами.» Но по-видимому *hates* Паыля углы 45 градусов в зодчестве, поэтому более изощренное разрешение были необходимы. Прежде чем настил был установлен, он нарисовал кривый «s» для того чтобы проиллюстрировать переход. |
| Домашн Dehumidifying эффективный способ энергии Posted: 12 Apr 2011 09:00 AM PDT
Spring is a time when warm air and cold air fight for supremacy, even in your home. This means a lot more moisture in the air as the warm air begins to gain its advantage as warmer weather advances, since warm air carries more moisture than cold. Dehumidifiers can help balance out the moisture in the air, and a lot of the issues that it can cause, mold growth being one of the most problematic. But, in this age of energy efficiency, how do you keep ahead of the humidity curve without overspending on energy output? Home and garden writer Alyssa Davis approaches that very subject here, outlining the basics of dehumidifying a space while being energy efficient, too. *** Using a dehumidifier in damp areas of your home can help to avoid problems such as moisture damage, mold and mildew. However, some people are hesitant to use a dehumidifier because they tend to use a lot of electricity. If you want to keep your home comfortably dry and yet save energy and money at the same time, here are some tips to help you dehumidify your home in the most energy efficient fashion. Understanding Your Needs Before shopping for a dehumidifier, it’s important to clearly understand your needs. Because dehumidifiers are generally categorized by the pints of moisture they can remove every 24 hours, you’ll need to know approximately how humid your space is, as well as knowing its overall size. Start by measuring the area. Then, assess the overall moisture levels of the area by noting some of the telltale signs of humidity problems. Once you know these two facts, you can look online for a dehumidifier calculator to help you determine approximately how many pints of water you will need to remove every 24 hours. The temperature of the space is also important, since you’ll likely need a model designed to operate at lower temperatures in spaces that average below 65 degrees Fahrenheit.
It’s important to look for the Energy Star rating when choosing a dehumidifier, to ensure that the model you choose operates efficiently. Although many older dehumidifier models can use as much electricity as a refrigerator, newer models are designed to be much more energy conscious and efficient. When choosing your dehumidifier, be sure to use the use the measurements and assessments you made previously to calculate how much moisture you need to remove. Don’t buy a dehumidifier that is more powerful than what you really need. Otherwise, you’ll simply be wasting energy when operating the unit, especially if you accidentally get it set too high. Economical Use of Dehumidifiers Once you have purchased an energy efficient dehumidifier, there ways that you can use it in a more energy efficient manner. Ideally, you should position your dehumidifier so that it is not flush against the wall or any furniture pieces, especially if your unit does not discharge the air from the top. This will allow for better air circulation, allowing for more efficient operation. You should also position the unit away from any major sources of dirt or dust, such as would be the case with woodworking equipment. These materials can clog the dehumidifier grills and coils, causing inefficient operation and perhaps even damage to the unit over time. Finally, you should always keep all windows and doors connected to the space closed while the dehumidifier is being used. This can be an especially important practice if the outside air is extremely humid. Maintain Reasonable Relative Humidity Proper use of the control settings can also help reduce energy consumption and cost. Although the controls will vary depending on the model you buy, you should try to avoid using the dehumidifier in a “continuous operation” mode whenever possible. Instead, you’ll want to set the controls so that the dehumidifier will shut off when the proper relative humidity level has been achieved. In most cases, you’ll want to maintain a relative humidity (RH) level of between 30% and 50%. A level higher than this could cause moisture damage and bacteria growth. However, if you continue to run the dehumidifier until lower levels are achieved, you’re probably wasting energy and money. *** Thanks, Alyssa! Alyssa Davis is a contributing writer for Metal-Wall-Art.com, your best online metal wall art store . She is also the number one design specialist on decorating with metal cranes art. Cheers, Rob. Home Dehumidifying the Energy Efficient Way is a post from: BuildDirect. We cover a variety of home improvement products including laminate flooring, hardwood floors, bamboo flooring, tile, decking and more. We also offer a wide range of info on interior design, housing trends, home how to, green building and living, and more. Related posts: |


| You are subscribed to email updates from homerenovation2 To stop receiving these emails, you may unsubscribe now. | Email delivery powered by Google |
| Google Inc., 20 West Kinzie, Chicago IL USA 60610 | |
Комментариев нет:
Отправить комментарий