Home-my-Home |

- Премудрость окна: Выполните проверку окна
- Face-Off плавательного бассеина: Хлор соленой воды v.
- Spotlight на Джемми Durie - холодном конструкторе ландшафта!
- Получать повиснуто вверх: Как повиснуть изображения и искусство
- Дома вала деревенщины
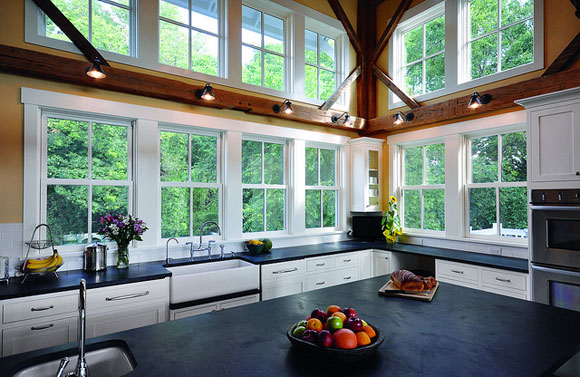
| Премудрость окна: Выполните проверку окна Posted: 31 May 2011 11:36 AM PDT
Without windows we'd all be living in dark depressing boxes (like some New York apartments). Windows are built into a homes style and frame the look and feel of your homes exterior and interior design. Windows must also withstand a lot of wear and tear. From open and closing to the extremes of weather that can push the elements of a window to it's limits. Here's what you should look at to determine the current state of your windows and not all of the signals that your windows need repair or replacement are as obvious as you think they might be. Watch the Flame Hot or Cold Check the Exterior
|
| Face-Off плавательного бассеина: Хлор соленой воды v. Posted: 31 May 2011 04:45 AM PDT Так вы рассматриваете принять погружение (har, har!) и устанавливающ at-home плавательный бассеин. Когда это прибывает в водой, вы имеете 2 выбора: соленая вода или хлор. Мы округляли вверх по немного подсказок для того чтобы помочь вам решить что само лучше, поэтому хватаем ваши изумлённые взгляды и крыла воды и читаем дальше! Системы водообеспечения соли океан *At-home. Кому нужна каникула пляжа если вы имеете плавательный бассеин соленой воды? Вы получаете океан-как чывство без ых пляжей или дорогостоящего тариф пассажирских авиаперевозок. *More удобное. Системы водообеспечения соли создают воду которая гораздо легке на коже. Вы вероятно не испытаете красные глаза или зудящую кожу по мере того как вы и в хлорированной воде, которая большое преимущество если вы и ваша семья будут сериями траты времени в бассеине. *Saves приурочивают и деньги. Хотя системы водообеспечения соли могут быть первоначально дорогле чем хлор, они более дешевы поддерживать над долгосрочностью. Они также более менее требующий много времени для поддержания, дающ вам больше времени насладиться бассеином! санобработка *Less. Недостаток соленой воды? Она поддерживает более высокий пэ-аш чем хлорированная вода, и над некоторым пэ-ашем, не санирует детали которые приходят в контакте с водой. Это нет deal-breaker, однако; вам как раз будет нужно контролировать солесодержание и пэ-аш воды и очищать по необходимости. |
| Spotlight на Джемми Durie - холодном конструкторе ландшафта! Posted: 31 May 2011 01:59 AM PDT Jamie Durie born in Manly Northern Sydney has become a highly acclaimed landscape gardener and horticulturist. He is also a television producer, program presenter and also a best selling author. He introduced the concept of the outside room in Australia and continues to encourage people to make the most of their outdoor space or garden. In between information about Jamie are some of his brilliant outdoor space ideas below.
A holiday to Palm Springs inspired Jamie on this pool side design! His popularity has increasingly grown in the USA thanks to several appearances on Oprah, giving gardening tips and advice and also his long running TV show The Victory Garden. It’s no surprise he has received several Logie awards for his popularity and lifestyle programs.
Transformed into a Mediterranean style courtyard! Jamie has a love of travel and it’s clear to see his designs are inspired by lots of different cultures. His heritage is Sri Lankan which also clearly reflects with his love of the eastern lifestyle and design.
Uncluttered private space to relax or entertain!
The blue touches here against the white are reminiscent of Mexican decor!
He brought his heritage of Sri Lanka into this design! Jamie has always had a deep connection with nature and the outdoors that helps to guide him in his design style and create awesome outdoor living spaces. He’s very keen environmentalist and always works to preserve our surroundings and is heavily involved in charities.
Folding doors open up the living area directly to the outdoor space!
Making the most of the outdoor space LA style!
Clever planting provides privacy!
A unique intimate hideaway with a reminder of Native American life!
The carefully picked plants that adorn this room will withstand the heat and droughts! Jamie actually trained in the USA with ex Vice President Al Gore to become a Climate Project Lecturer and since has travelled all over the world giving lectures. He’s also an Ambassador for the Sydney Royal Botanical Gardens, Planet Ark and the children’s cancer group Plan International. He famously presented the Australian Conservation Foundation Free Spirituality and Sustainable Forum alongside the great Dalai Lama where he gave advice on reducing carbon footprint and helping to retain a healthy enviornment.
An instant impression here is of French romance!
Keeping the walls alive with natural herbs and vegetation! Jamie is most famous for his hit TV show ‘The outdoor Room’ and his debut on channel 9 hosting the Australian version of Dancing on Ice with Jane Torvill and Christopher Dean. However he’s presented many shows including Jamie’s Journey with the Children of India, Back Yard Blitz, Dancing with the Stars, and Australia’s Best Back Yards that have only added to his credibility and celebrity status.
His creative impulse here came from the serenity of the Ojai Gardens, California!
A cool outdoor den to hang out in!
He brought Miami style art deco to this back yard!
This outdoor space design oozes African influence! His collaborations with many artists and designers inspired him to create his own range of outdoor furniture and gardening items. His furniture range Patio is affordable yet high quality and stylish, his Durie Design is focused on more bespoke items designed specifically to a high standard for particular projects, and his Signature range of carefully designed products are available through specialist stores.
A beautiful spot to enjoy and have privacy with the added curtains!
His love of the Far East is quite clear here!
The center of entertainment with a hint of the Hamptons!
The arched wall adds a touch of Spanish style and atmosphere!
A transformation from concrete backyard into a lush relaxing outdoor space! Jamie is currently on a garden tour in Dunedin in New Zealand, but has been busy filming a new show for Australian TV soon to be on Channel 9 called Top Design. Its a design competition show where Jamie is also a judge as well as the presenter. He has just released a new book called Jamie Durie’s Outdoor Rooms and his design team at Durie Design are on a very exciting restoration project within the Great Barrier Reef on Hayman Island. Source: jamiedurie.com
|
| Получать повиснуто вверх: Как повиснуть изображения и искусство Posted: 30 May 2011 12:00 PM PDT In my non-scientific polling, most people procrastinate when it comes to hanging photos and art. And why not? Let's face it, it's intimidating. The couch, if that doesn't look right, you push it to the left a bit. The 24×36" painting, though? Get that wrong and it involves fixing drywall, sanding it down, vacuuming, and painting. "How to hang pictures" is a Google search worth doing, but the variety of tips are incredible — from simple to complex, there's something for everyone in those 87,000,000 results it turns up.
From galleries offering advice you need a physics degree to pull off, right through to mock-ups with paper cut-outs, there's a world of debate on how you do or don't hang your artwork. This blog post about how to hang artwork and not screw it up even purports the answer is as simple as a one-size-fits-all T-shirt: universally, one hangs artwork exactly at a 57"-high center. If it were that cut-and-dried, would Google have 87 million results for that search? There’s no perfect answer, but there are a lot of considerations, so here’s what to keep in mind the next time you’re fixin’ on a hangin’. Two how-to questions: How to Hang it, and Where?There's two parts to picture-hanging: The technical side, involving hooks and hammers, and then there's the aesthetic aspect. When it comes to hanging’s technical side, it's gotten much easier in the last 10 years. Nowadays, newfangled gadgets, like my friend's “Hang & Level” he scored after moving, can cut the task's complexity by a mile. Having the right tool for any job makes it easier. This "Hang & Level" tool lets one find the spot, press in, and it leaves a mark where the nail goes. Its best contribution is skipping that annoying "where picture hook meets with wall hook" extra-measuring equation hassle. With this, or tools like it, a laser level, a hammer, and a ruler, one can hang pictures in groups with gallery precision. So, now that we no longer need a physics degree to get pictures hung with precision, what are some considerations when hanging art? How high is too high?
For the most part, we're told to hang art at "eye level." This means, your visual center (about a third down from the top of the art) should be at eye height. Whose eye level? Yours. Usually, I follow this rule and it's served me well. Over a sofa or sidetable, one is often inclined to hang art lower, and this is also a great move. Arguably, when seated, it's just slightly above "eye level" then. All you can really do is assess your furniture, space, and your gazing stance, and find a medium that works for your setting. If you don’t trust your judgment, ask a friend to join you for the hanging festivities. While display height can often be problematic, it's in grouping pictures that people generally go wrong. Hanging out with friends: Grouping artworkNo matter what the size of the photos or artworks you're grouping, the best thing to remember is that you want an equal distance between every piece. When you start getting one-inch gutters between frames, three-inches there, it looks sloppy. It's a nice, clean gutter that makes the difference between Bob's hallway photo array and the gallery down the street.  Photo: illowhead designs While this blog post about hanging wall art is technical, dryly written, and too solution-specific, given the huge variety of options people work with, their mocking up of same-size paper cut-outs is a great way to see why you want a nice, clean and equal space between your pieces. For people who need more for visualizing when hanging their artwork, moving paper mock-ups around until you like the balance or weight of frames is a great way to get a sense of your arrangement. Getting Hung Up on Style, and other thingsFrames and gutters are great, but subject and style have a lot to say when it comes to how well art grouping works. Putting a cubist artwork next to folk-art needlepoint likely won't work for you, but maybe you roll that way. I don’t, but that’s the great thing about personal taste. Black-and-white portraits and landscapes work with lots of other mediums, so they're something you can keep around as "group complements" when putting art groupings together.  Photo: Lars Plougmann Color is a great way of choosing groups to display. Maybe you have similar colors throughout matting and framing, or a dominant color showing in all the pieces. Tying them together in one display can create a powerful visual. Genre-grouping always works well too. As long as you don't have too clashing of color and lines, you should be safe in pairing a few examples of one genre in a set, such as art deco, landscape photography, and so forth. Don’t take the leap without laying all your grouped works on the floor to a sense of its impact and cohesion. It’s worth taking a little time here to try all the different placements for each photo, until you love the way it looks before you get to the actual hardware-on-wall step. If you like it on the floor and take the time to get the layout right, you’ll love it on the wall. Do it right the first time: Some cautionIf your art is valuable and you'd like to preserve it, be aware that direct sunlight can fade artwork — and valuations — within months. Keep it away from windows that would offer direct exposure. Finding the perfect spot and doing all this work is for nothing, though, if you don't use proper hanging mounts. My best advice to you? Mounting wall art is like mounting a horse — best done with caution. Carpentry nails can do the trick, but proper picture-hanging hooks are designed to carry designated weights (50 pounds or more, for some) and are often available several to a pack for $2. They're money well-spent. Look on the packaging for the weight supported by your chosen hardware. Even using the proper hardware for a heavy frame likely won't save you if there's no support behind the drywall. When hanging a large, heavy mirror or framed work, a stud-finder will guarantee you're mounting it safely in a proper weight-bearing spot. You don't want my friend's experience of returning home to a broken frame on the floor. In the end, the best advice is a twist on the classic carpentry motto: Measure twice, hammer once. With planning and preparation, your home can really be as pretty as a picture gallery. Getting Hung Up: How to Hang Pictures and Art is a post from: BuildDirect. We cover a variety of home improvement products including laminate flooring, hardwood floors, bamboo flooring, tile, decking and more. We also offer a wide range of info on interior design, housing trends, home how to, green building and living, and more. Related posts: |
| Posted: 30 May 2011 09:00 AM PDT Part of your Rite of Passage as a child is constructing a tree house or clubhouse with your own bare hands; no formal training or fancy materials, and just daydreams as your blueprint. The gallery below is kind of like that, except the builders were most likely capable adults with lots of vision and little know-how. The House that Drunks BuiltMaybe the folks that built this haphazard tree house are qualified and licensed contractors by day; however, this appears as if it was built at night – after plenty of Uncle Buck's moonshine. Just imagine the conversation that persuaded the others that the hub cab tied to a rope was good enough to act as a load-bearing wall. Image source: http://nickmcglynn.com/treehouse.jpg A Truck in a TreeDon't ask how he got the truck up in the tree – in fact don't ask questions at all – all you need to know is that this man's man has a 52" barrel chest, an athletic stance, and a Members Only truck in a tree that he will protect with his life. Must love Merle Haggard and Marlboro to enter! High Above the Pole TopsWhen the river waters start to rise over the banks, most residents aren't prepared for the disaster ahead – except this Boy Scout. By perching a metal mobile trailer high upon a telephone pole, he's created a tree house that doubles as a refuge from would-be rising water. Now, when a lightning storm hits, that's a different set of problems… Image source: http://buckanddusty.com/images/Rednecks/Tree-house.jpg HoneyBucket HouseRather than judge this redneck tree house too harshly, let's offer praise to the visionary. After all, what most people saw as a lowly porta john, this crafty country boy saw as a prefabricated man cave; complete with 4 sturdy walls, a window and a ventilation system for when boys will be boys. Bravo for your resourcefulness! Image source: http://jonbryan.com/uploads/BradsDeerStand1.JPG Junkyard JalopyThis arborist architect has obviously adopted the green movement and its emphasis on recycled materials. In fact, they clearly avoided the cost of new lumber (and zoning licenses) by taking the trash that would have been thrown in the city dump and instead, threw it in a tree – letting everything stay where it landed. Image source: http://gabooshappytimeplace.files.wordpress.com/2010/07/neighbors.gif Tree House TrapezeLook! It's a highflying trapeze act! No, that's a tree house. As brilliant and beautiful as it might be at the circus, you know you've built a sketchy tree house when part of your design implements a safety net. Warning, falling children present. Image source: http://addittothelist.files.wordpress.com/2008/01/dsc05794.jpg Treetop High-RiseAs redneck as this might appear and as much as the neighbors might complain about this tree house high-rise looming in their backyard, kudos to the brave souls that climbed the length of these trees to make this happen – not only was a fear of heights not an option but imagine carrying each piece of scrap lumber up by hand. Image source: http://myconfinedspace.com/wp-content/uploads/2008/03/redneck-tree-house.thumbnail.jpg Tree … Bench?Part of the point of a tree house is to provide your self some room to roam but that must not have been a priority for this redneck perch – this crudely set bench-in-a-tree seems to be more of a drinking stoop than a functional tree house. To each their own! Image source: http://farm3.static.flickr.com/2056/2513761008_0812100388.jpg Forest FortressWhile the rest of the redneck tree houses above are rag-tag at best, let this structure stand as one of the more impressive feats of back-country construction. Reminiscent of something straight off of the set of Robin Hood Prince of Thieves (with Kevin Costner), this homemade tree house would be more accurately described as a fortress than a house. Image source: http://i.ytimg.com/vi/A5ZZNAdpoQA/0.jpg Redneck Tree Houses is a post from: BuildDirect. We cover a variety of home improvement products including laminate flooring, hardwood floors, bamboo flooring, tile, decking and more. We also offer a wide range of info on interior design, housing trends, home how to, green building and living, and more. Related posts: |


| You are subscribed to email updates from homerenovation2 To stop receiving these emails, you may unsubscribe now. | Email delivery powered by Google |
| Google Inc., 20 West Kinzie, Chicago IL USA 60610 | |